Those of you who have followed this blog for a while would know that I’ve long been looking for proofs that one doesn’t need copper carbonate, a toxic (and expensive) chemical, to achieve the kind of maroon reds and blueish grays commonly associated with copper fuming.
I came really close to showing that I can get the same effects with copper netting from “Chore Boy” type copper scrubbers; but a real proof would require not having any copper carbonate in the pit at all — which I couldn’t really do in a group firing, where other people were there to get nice results for their pots, and not to help me prove or disprove some fine point in pit firing theories.

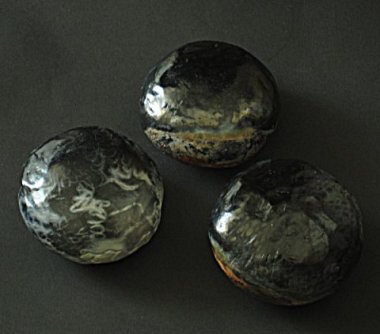
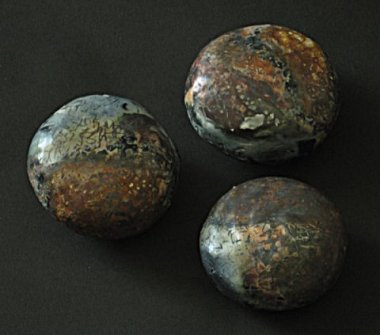
But now I have my own test pit, and the only pots at risk are my own. Woo-hoo! So after two successful firings using my standard method, proving that this test pit works just as well as any other I’ve used before, I went for a test firing with no copper carb at all in the pit, and was very pleasantly surprised to see some very respectable looking results (figure 1) for my efforts.
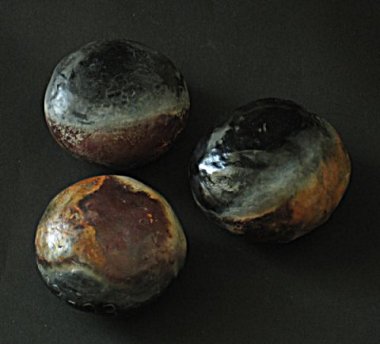
Here again, in figure 2 above, is another view of these three pieces, showing the bottom side that was embedded in the sawdust during the firing.
Well, the pieces surely look decent enough, and I have no complaint about them aesthetically; but after a while I noticed something. There actually wasn’t much — if at all — of the maroon reds and blueish grays that I was hoping for on these pieces.
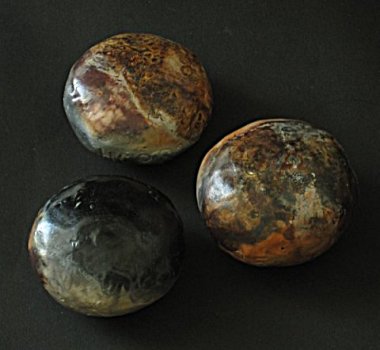
What we have here is more an orange brown instead of maroon red, plus a cast of yellowish tint to the blue-gray areas, making them look somewhat greenish. For comparison, see these three pieces (figure 3) from a previous firing with plenty of copper carbonate in the pit.
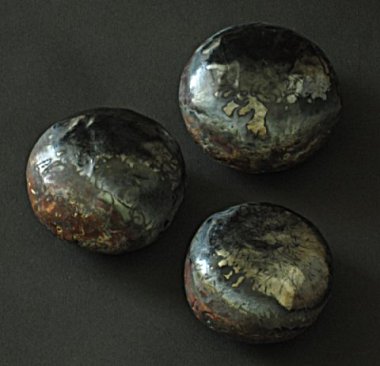
Again, in figure 4 below, is another view of these three earlier, copper carb-fumed pieces. Here, too, you can see they have colors noticeably different from those of our “Chore-Boy” only pieces (figure 1 and figure 2).
So I was mystified. Take a look at these two pictures at the top of this earlier post, where I almost proved I got those copper red from Chore Boy mesh only: now that red clearly came from the Chore Boy netting, no? You can even see the unmistakable footprint of the copper mesh in the second picture there. In red, no less! Would I be asking too much to have just a little of that red here?
I remained puzzled until I went shopping one day for the next batch of copper scrubbers, and noticed, upon my return to the studio, what was printed on the packaging. “Copper coated”, it says.
Hmm… so what’s really inside these things there that got coated with the copper? It so happened that I had a small magnet nearby, so I placed it near one of the scrubbers, and voilà, mystery solved — this is basically a steel scrubber!
Now everything started to make sense. The thin coat of copper was burned off early on, leaving few traces on the pots. The remaining steel mesh then gave out fuming effects similar to what steelwool would do — yellow tints and orange browns.
The next logical step, then, was to go hunt down some scrubber made with 100% pure copper, and do another test firing. The result of that firing is shown in figure 5 (above) and figure 6 (below.)
Note that in this firing I didn’t use any steelwool at all, and there wasn’t any copper carb in the pit either. Just the 100% copper mesh and salted raffia packed around the pieces, plus my standard sawdust and horse manure in the pit.
So now I’ve got my copper red back. And the blue gray zone — now that’s some of the prettiest blues I have ever seen on pit fired pieces.
There are also a couple other things worthy of note here: firstly, I’m sure you’ve noticed different kinds of black, e.g. shiny and metalic vs. rich and deep, in the jet black areas of these pieces (see figure 5 above).
This actually is not something new or unique to this firing, but in the past this variation in the jet black area became obscured by the waxing of the pieces afterwards, which deepens the tonal values of the shiny metalic area and makes it less distinct. Here the black areas have been left unwaxed instead, so the full tonal range is preserved.
Secondly, the terra sig flaking and peeling problem is still with us (figure 6, piece in upper right.) To be sure, I have changed my way of working, i.e. to not burnish the pots before the terra sig application, and as a result the lossage rate has been greatly reduced in all firings since then. Still, as you can see here, the problem is not totally gone; and I’ll have to go back and confront this issue again one of these days.
Hi, I love reading your journal, please keep writing, I can’t wait to read the next one. Thanks
Juliet
Hi, I love reading your journal, please keep writing, I can’t wait to read the next one. I’m conducting some experiments of my own and seeing someone else enjoy this as much as me is very helpful.
Juliet
Thank you for the kind words. I’ll try write more frequently too. ;-)
Hello, thank you for the blog. I am new to all of this so i find it helps me so much. I wanted to mention an article about Terra sig that I found. maybe it will help answer some of your questions. it is written by Vince Pitelka. i believe i found it on the appalacian Center for Craft, Tennessee Technological university site. Called super refined terra sig, he headed research regarding this technique using a very sensitive hydrometer rather than a receipe. according to his research, and his grad students, it does not require burnishing for a gloss and can be fired to higher temperatures. Thank you, keep blogging!
Thanks for the tip. Actually I have read Vince’s article, and have links to the article, as well as the Clayart discussion threads in which he also participated, in both my Resource Page and my original post about the terra sig problem.
These days I generally don’t have a terra sig peeling problem if I have a quiet firing — but sometimes I like to use a bellows to intensify flame action near the surface of specific pieces, which often results in more intense colors as well as a higher probability of terra sig flaking. Also, Chad Dykstra once told me that he found concentration of salt to be the culprit for his terra sig flaking problems.
Oh, also, i read where someone uses copper carb from the garden store as it is much cheaper. I do not live in the USA so finding cheaper materials is far more difficult.
I’d also be interested to see what your pots look like without ANY terra sig – just burnished by itself. How much color is “lost” when you try? I haven’t tried terra sig, yet, and I bisque at a much higher temp for now, but I’m still hoping on picking up some color. We’ll see!
Debbie
I was hoping to reply to your question with a new post comparing terra sig vs. burnished only vs. completely untreated surfaces; but alas that post has been sitting in draft mode for almost 2 months already… but it’ll be here any day now! :-)
So, for now, here’s a quick answer: I’ve found pieces that are burnished only (i.e. no terra sig) have a more subtle and muted range of colors, which I actually have grown to like more than the terra sig ones. I don’t think I can embed a picture here, but here is a link that you can click on and have a look, and here is the back side of those same 4 pieces.
As to bisque temperature, I’ve gotten very decent results with cone 06 in the past (but all with terra sig), and have seen ‘good enough’ colors on cone 04 pieces too. Still, I prefer cone 08 or lower. These days I typically bisque fire my rocks to cone 012, since they are pretty sturdy structurally and won’t be too fragile even at such a soft bisque.