Three years ago, when I first started this blog, I wrote about using a BBQ smoker for pit firing, because I did not want to draw unwanted attention from nosy neighbors and fire marshals. As those of you who live in modern big cities would know, we often have all kinds of fire ordinances and burn bans to contend with, and striving for a look of innocently doing what every other urbanite or suburbanite would be doing is an important ruse for self preservation, if one is to succeed in pit firing in the city (or suburb) in the long run.
Unfortunately these BBQs didn’t work out all that well, as they were not designed for the prolonged high heat generated by a log burning fire. My BBQ smoker, for example, has paint on it that would start to burn after a while, and would give out noxious fumes and visible black smoke. Talking about trying not to draw attention! So I gave up this approach after just a few times.

Then I started to see these stand-alone outdoor ‘fire pits’ made of metal or clay at the patio furnishings section of department stores. Would these work for my purposes? After all, they were designed to burn logs, no? So I bought a cast-iron one (figure 1) from Home Depot and start to experiment with it. I did my first firing with it at the end of April this year.
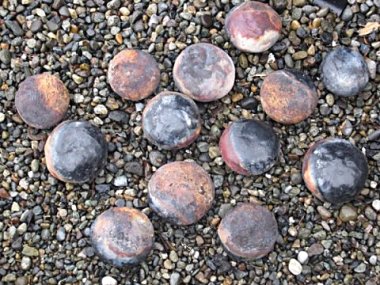
Initially, I worried a little that, since the bottom of this ‘pit’ thing doesn’t touch the ground, the firing may cool too fast, resulting in incomplete color development, or worse, in cracking and breakage. Well, it so happens that my fears were unfounded. The pieces turned out just fine — see figure 2 beblow: a group shot from the second firing, just after the pieces were removed from the pit, before any cleaning or waxing. Oh the first firing was good too, but I didn’t have a group shot like this to show you. :-(
So now I have a little test pit to try out different fuming methods and effects, and to ask questions that I’ve been itching to have answers for, e.g. can I get away with not using any copper carbonate at all? How about using no copper of any kind, not even the copper nettings (e.g. from a “Choreboy” type copper scrubber), just steelwool and salted grasses? Or no copper, no steelwool, and just the salted stuff? Or how about using copper and steelwool, but no salt at all? Or…
Do you want to know the answers, too? Stay tuned. As it turned out, I have done many of the experiments already — I have done 10 firings in this test pit so far — and will show you some of the results shortly in an upcoming post.
Meanwhile, here is another picture of a nice piece from this firing ( figure 3 below) after it has been cleaned and waxed.
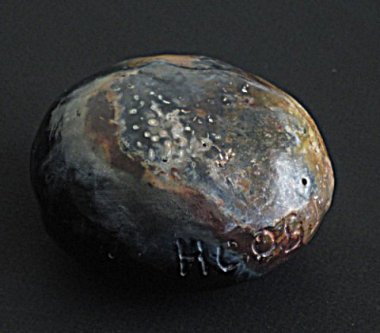
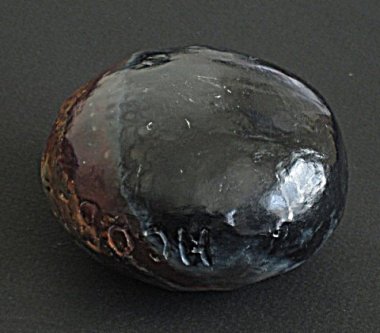
And below is the other side of the same piece (figure 4). Notice the inscription on the piece — which says “HC0812-23”. Okay, here is what this is all about. “HC” is my initials, “08” is for the year 2008, and “12” for the month of December, and “23” means this is the 23rd piece made in the month of December 2008.
Someone once asked me whether this is an On Kawara kind of thing. Well, no, actually it isn’t. Not at a conscious level anyway.
For me this is simply a unique identifier — a serial number, if you will — for the piece, that comes in handy in conjunction with meticulous note taking, which I usually do. Here, for example, I can look up my studio notebook and see that this “HC0812-23” piece was made with OH6, a white porcelaneous stoneware clay from The Clay Art Center, that it has two coats of OM4-based terra sig, and that it has been bisque fired to cone 012.
Also, from my firing notebook, I can see that this piece was packed with my standard three amigos of steelwool, copper netting (“Choreboy”), and salted raffia, and that it was placed in the first layer (directly nestled in sawdust) at the north end of the pit.
In the photo below (figure 5) is another piece from the same firing. Again, from its unique identifier, HC0812-35, I can find out that it, too, has two coats of OM4-based terra sig, that it was bisqued to cone 012, that it was placed in the first layer in the pit (at the south end), and that it was packed with the same three amigos of steelwool, copper netting, and salted raffia. The claybody, though, is a commercial buff-color stoneware called Idaho Buff, also from The Clay Art Center — and not the porcelaneous, B-Mix type OH6 used in the previous piece.
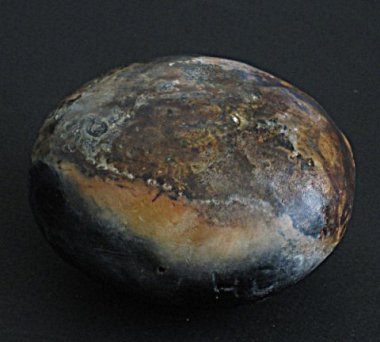
Below is yet another view (figure 6) of the same piece.
“Aha!” — I can almost hear some of you exclaim now — “I see these nice maroon red areas in the OH6 piece, but none here. So white porcelaneous clay gives you these reds, and the buff clay doesn’t, yes?”
Well, no, not so fast please, my friend.
Remember, we have precise documentation on clay body, surface treatment, bisque temperature, etc. because these information can be easily recorded and documented. In a typical pit firing, however, there are a lot of other information, some of which are far more critical than what we have here, that are nearly impossible to record with any degree of certainty and specificity.

A prime example is the flame pattern. How much flame action did each piece get to see? For how long each time, and at what stage of the firing did this happen?
Another is the firing atmosphere local to the piece in question. How early did the piece become exposed, and thus had its fuming materials burn in an oxidizing atmosphere? Did it then get buried by embers and ashes again, and thus entered a reduction phase locally? And when did this happen? And did the ashes burn down eventually and re-expose the piece again before everything cooled down?
While impossible to document precisely, such information can be gleaned in a general way, via written notes in conjunction with photos and videos taken during the firing; and they provide important clues to interpret the results of the firing. I’ll have more to say about this in a future post.
I salute you… this is better than you gave it credit for… so impress with the simplicty of you fire pit…. really out side the box… do you have sand in the bottom and then sawdust???? or just let the metel pot cradle your rocks??? great way to keep a jornal
No sand at the bottom. Just sawdust. But you are giving me an idea — I think I’ll try an experiment with sand instead of sawdust, or with just a little sawdust or manure on top of the sand. Could be one way to reduce carbonization and avoid the jet black area on the pieces.
For those of you who have known Sam Lalley, it is with deep sadness that I’ll relay to you the news that she has passed away this past summer.
RIP Sam. We’ll miss you.
Looking fwd to other posts….I want to see what you have experimented with & come up with! Thanks
Hi – I am really impressed with your pit firing techniques, the pots look fantastic.
I am trying to bisque fire terracotta clay in a pit firing at home.
Think I can do this by firing in a weber grill, or a standalone patio fire pit like you did?
Ideally, I would like some indication of the temperature reached, as my previous pots turned out well when fired in kiln at cone 08, (roughly 1770 degrees).
Any info you can provide is greatly appreciated!
Thanks,
Roy Strauss
Sorry about the long delay in my reply, as this is a real tough one to answer.
First off any kind of pit firing is probably not the way to do a real ‘bisque firing’ in the conventional sense, as the pit is not really a kiln, but more like the firebox in a conventional kiln design. In other words, you have widely varying, very uneven temperatures from the get go — which subject your pots to all kinds of extreme thermal stresses — and no insulation to retain and build up the heat needed to vitrify the clay. BTW It’s not temperature per se, but heat work, that transforms clay into ceramics.
With that in mind, both the Weber and my cast iron ‘pit’, and indeed most pit firing techniques, are very poor choices for attempting a conventional firing, including bisque firing. Instead, what you might want to look into is kind of the next stage in the evolution of pottery firing from the open pit, i.e. the building of a simple updraft kiln with bricks, mud, shards, etc.; most probably separating out the firebox from the ware, too, in the process. Here is a book that should help you along the way: Primitive Pottery by Hal Riegger.
As to the temperature reached, I’ve never measured it, but based on what I’ve read the upper range is about 1000F to 1500F depending on whom you ask; though as I mentioned above it’s not the top temperature reached somewhere in the pit that matters — rather, whether and how one can arrive at the desired tempature at a uniform pace in a controllable manner, that’s the real question.
Hope this helped.
Gostei muito da idéia do seu jornal. Estou pesquisando sobre “pit fired”, e suas informações foram muito esclarecedoras.
Christiane, obrigado pelos elogios… glad you’ve found the information here useful!
Hi Claymonk, I can’t tell how excited I am finding your blog. I am primarily a painter who spent a few years back in the late 60s learning to make pinch pots with Paulus Berensohn at the Wallingford Arts Center in Pa. and now pinching again and wanting to learn all about BBQ and related ways of firing. I admire your work and wonder if I may ask you questions from time to time about the mysteries [at the moment] of this craft.
I have, at this time no interest in being published.
Regards, Bernie Fierro
I have a 20 gallon metal mixing kettle that I’d like to convert into a fire pit. I was thinking of making a slab with sand then cement blocks for the bottom then surround the container with landscaping blocks. What do you think?
I’m having some difficulties visualizing what you have in mind, and I’m not quite sure why you’d need the metal mixing kettle, except perhaps to hold the sawdust together. But it seems what you have in mind should work fine nonetheless, at least for the way I fire.
You might want to check out a couple photos of a small temporary brick structure that Eva Funderburgh has built for pit firing: the enclosure and the firing in action.
BTW this is a fairly common way to build a ‘pit kiln’ with bricks — I’ve seen ones that are up to 4’x 8’x 4′ in size, and you can adjust the gaps between bricks to vary the airflow allowed into the structure during firing. The gaps can be plugged with damp clay during the firing, too, if desired.
Hi Claymonk, may I have your email address so that I may contact you with a few questions?
Bernie
I’ve sent you email about a week ago; did you receive it?
BTW for those of you who would also like to communicate with me directly, the best way to do so is to use the contact form, as it is connected directly to my regular email account, and your message would remain private and not showing up here.
I have been using a similar set up for pitfiring, I’m using an old washer drum that we converted into a fire pit, however due to a recent burn ban I must keep a lid over top of it which keeps putting the flames out and reducing it to smoldering rather than actually burning my fuel (mainly sawdust and shredded paperwork). The holes in the drum led to nice swirls in the smoke but with so much non burnt fuel large sections are of course unfired. I will be doing some more “pitfiring” soon with the lid elevated a little more with hopes of a more even burn, just felt the need to share another non-conventional option.