Well, well… it’s been over a year since my last post here. Though I did not get to fire much in the last two years, I finally managed to achieve fairly consistent results by the last couple firings. The firing method remains essentially unchanged, i.e. a fast 6-hour affair in a relatively shallow pit, details for which can be found here and here. And I still use mostly cone 6 porcelaneous clay, but now bisqued to cone 010 instead cone 06.
(Update 2009-10-25: now I typically bisque my pieces to cone 012 instead.)
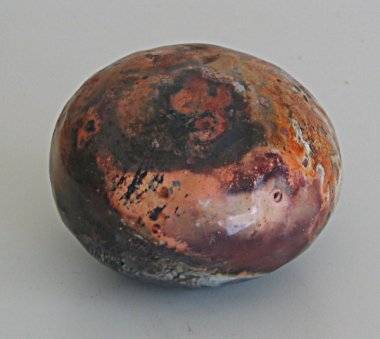
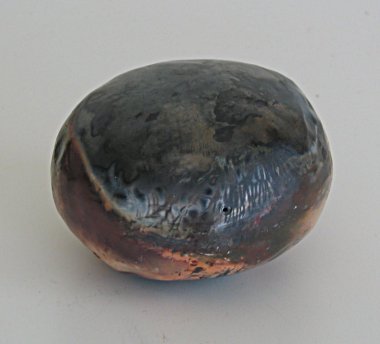
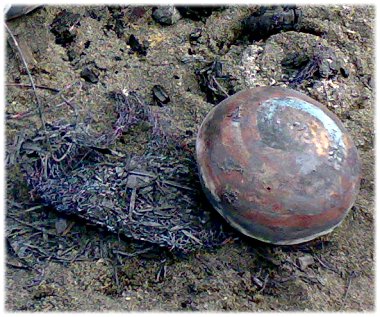
What I want to write about in this post, though, is how I use fuming materials to achieve the kind of results as shown in photos above (figure 1) and below (figure 2). This approach, of course, does not work aesthetically in all situations — so I am offering this only as a hopefully useful reference. As always, take whatever you need from it and adjust to your own requirements as you see fit.
But first take note and see how different the piece looks from the more common pit fire results (figure 3). In particular, there is no bare area on this piece — every square inch of it is covered with fuming marks, and the colors are rich and deeply saturated as well.
So what’s the secret? Besides the use of terra sigillata and a low bisque temperature at cone 010, the real key to the colors is what I use as fuming materials, and how I pack them around the piece before the firing.

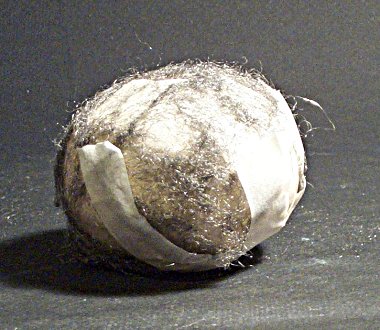
Without further ado let’s jump into the description of my three amigos, the three key ingredients that I’ve packed around just about every piece I’ve made for those recent firings. First is steel wool (figure 4), which I usually pack as the first layer directly on the piece. Note masking tape is used to secure the steel wool strands, and to keep them as close to the surface of the piece as possible.
As I’ve written in a previous post, it’s critically important that you separate the steel wool into fine strands before attaching them to your pot, or else you’ll likely get a big flat unsightly brown spot instead of nice flashes of beautiful colors!
In general, I’ve found it helpful to think about breathing — i.e. allowing your pot to breathe even as you pack layers and layers of fuming materials around it, so that flames and turbulence can reach in, stir things up, interact with the fuming chemicals, and deposit all kinds of colors onto the surfaces of your piece.
The second of my three key ingredients for fuming is copper nettings (cut from a common household copper scrubber, e.g. ‘Chore Boy’.) Note that in the photo (figure 5) below I have the ‘Chore Boy’ and steel wool covering different parts of the piece, because I was performing an experiment to see which material causes which kinds of effects. More typically I use both in the same area and applying them on top of each other, instead of keeping them separate as shown here.
(Update 2010-12-14: these days I frequently — but not always — place copper mesh in the first, and steel wool in the second layer instead, which seems to produce more interesting results than the other way round, usually. )
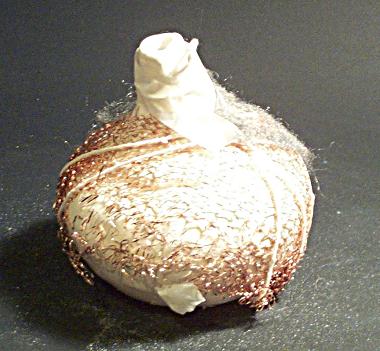
Again, I hold the copper nettings close to the surfaces of the piece, using masking tape as well as twine in this case. I often use only masking tape, however, and suffer no ill effects from doing so.
The last one of my three amigos is salted raffia (figure 6) or salted burlap. Take note of the word ‘salted’!! This is basically a kind of artificial seaweed, and the key chemical is the sodium chloride in the salt. This is not just grass — it’s salted grass. And, once again, it’s wrapped tightly over the other layers and the piece itself with the help of masking tape.
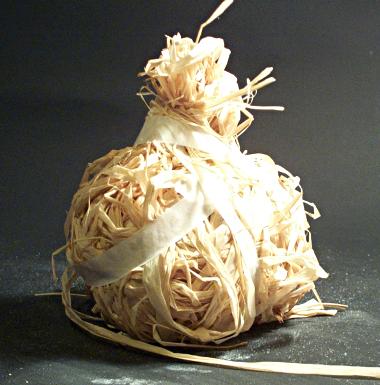
Note how much raffia I’ve used. It’s all around the piece in a thick layer, covering its surfaces completely. Note also that, while this raffia layer looks formidable, it’s not air tight at all. Remember we talked about breathing a while back? So now we have a breathable saggar of sort — yeah, this is the key idea, which we’ll come back to later in this post.
Now that I have my three layers of iron, copper, and salt (the three amigos viewed chemically), I simply wrap a final single layer of newspaper (figure 7) around the whole thing and call it good.
Note: if you wrap more than two or three sheets around a piece, then the flames may not burn out the paper completely in some firing situations (hint: think breathing again), resulting in a darker and smokier piece with muted colors — which could be what you’d actually prefer, of course.
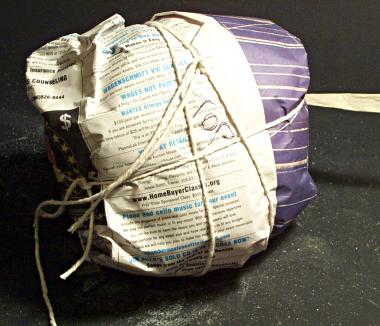
This is not a critical step, though, and I don’t always wrap my pieces with this final layer of paper; but one advantage for doing so is you can write on the paper to mark how the piece should be stacked in the pit. In this case I had written the word ‘top’ to indicate which side of the piece I want facing up in the pit, so that the opposite side will be buried in sawdust and hopefully turn jet black as a result.
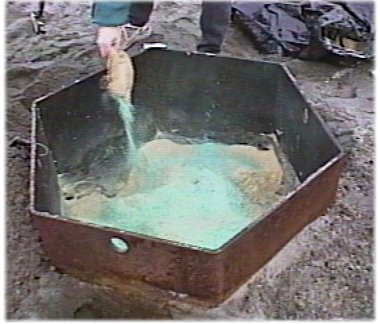
Now, about the pit itself: people sometimes ask me how much copper carbonate I put into the pit. Since it’s hard to describe in words, here is a photo (figure 8) of the typical amount and method of application.
In other words, the copper carb is sprinkled onto the sawdust (and/or dry horse manure) layer, in an amount that makes the pit look greenish while still allowing the underlying color of sawdust, etc. to show through.
These days I don’t usually put any other chemicals besides copper carbonate in the pit, even though I have experimented with baking soda, epsom salt, etc. in the past.
Oh, a note on safety: always wash your hands after handling that nasty green stuff! Better still, wear latex gloves whenever you work with copper carb or similarly toxic chemicals.
(Update 2009-10-25: check this new post and see that you don’t really need to use copper carbonate to get the nice copper fuming results.)
Now, before we go on further, you should take note that this method for packing fuming materials is closedly tied to the specific firing method I use. As I mentioned earlier, I fire in a relatively shallow pit with a raging fire for 2 hours, followed by 3 hours of fairly rapid cool-down period. The whole firing should last no more than 6 hours including prep and clean-up.
Shown below (figure 9) is how the pieces are stacked in the pit. The pit layout is like this: a 2-3 inch layer of sawdust and/or horse manure at the bottom, followed by one or at most two layers of pots, then a layer of kindling, and finally the main fuel — typically firewood of medium sizes. The fire is stoked as needed for 2 hours with addition of firewood usually about two to three times the initial amount.
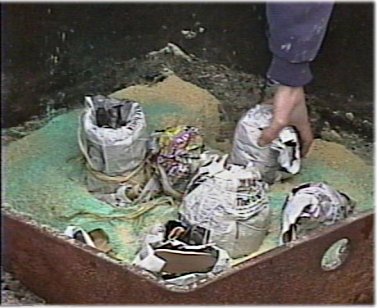
And here is the most important aspect of this layout: there is no sawdust around and above the pieces, and the pieces are exposed directly to flames and turbulence — except when partially blocked by protective shards so placed or by other pots — during the initial 2-hour raging fire period. In other words, this is not a slow burn down process as is common in a more typical deep pit or barrel firing.
In a sense this style of firing is more akin to an open bonfire, and with this in mind I now return to the notion of breatheable saggar mentioned earlier. Let’s take a look at the photo (figure 10) below of a pit at the end of a firing.

See how the hot embers have burned down to the bottom of the pit, completely exposing all the pots? However, unlike the naked cylindrical forms next to it, the roundish piece is completely covered by a fuzzy coat of something or other.
This fuzzy coat or shell, barely clinging to the surface of the piece — now this is what to strive for when using this packing method, i.e. to have this breathable saggar — or whatever is left of it — still remaining (but barely so) at the end of the firing.
Below (figure 11) is a closer look at a similar piece from a different firing, where this flimsy saggar shell remnant had just been peeled off after the piece’s removal from the pit.
A closer look at this shell reveals that the copper nettings (i.e. ‘Chore Boy’) provided the underlying structure to hold the shell together, while the steel wool strands, some unburned raffia, and some ashes helped flesh out the now fabric-like shell.
So herein lies the key to having success with this fuming method: if you have a shell like this to peel off when you take your pot out of the pit, you’ll have a very good chance of seeing some nice fuming marks and colors once you get this shell off.
Well, at least this has been my experience so far. I hope you’ll have the same results as well; and if you have any success with this method — hey, drop me a note. I’d love to hear some success stories! And don’t forget to experiment and to adjust this method according to your own firing situations. Good luck!!
Appendix: How To Make Salted Raffia/Burlap
I’ve learned this from Maria Spies. In the U.S., raffia (and burlap) can be bought from craft stores like Michael’s. Canning salt is available in many grocery stores. Regular table salt should work fine, too.
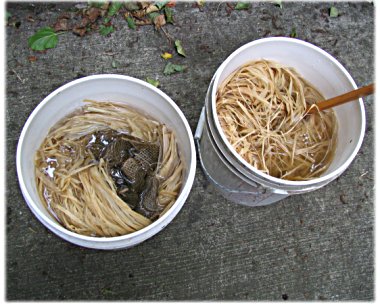
Here is the procedure: gradually add 4 lbs of canning salt into 2.5 gallons of hot water, stirring as you go. Stir some more after all the salt has been added. After the salt has been fully dissolved, add in the raffia and/or burlap (figure 12). By the way, you may want to wear rubber gloves while doing so; this is a very saturated solution of salt and is somewhat caustic.
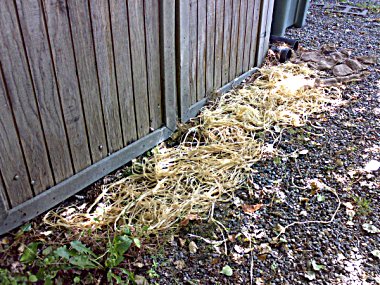
Leave the raffia and/or burlap soaked in this brine for 2-3 days, then take them out to dry in the sun (figure 13). Take care to not spread them on top of vegetation (e.g. your lawn) as the salt tends to kill whatever is underneath. Once dried place them in sealed plastic bags, away from any steel tools, cabinets, and other implements that are not rust-proof.
I am doing naked raku and have decided to experiment with pit firings as well. I made a small pit with old refractory bricks and tried 2 firings . Results were not too bad, but was not too sure what was happeninf. After reading your descrition of how you go about your firings am edging to try out another pit firing tomo. Will let you know the results. I am a Potter from India
thanks for the salt application and you can get burlap from coffee shops also old coffee grounds for your garden while you are at it….
Good to see you again today. Interesting website.I would love to come to El Salto and or Ixtlahuacan with you and your friends next week or week after. Regards, Diana.
Hi Diana — I’m afraid I am not who you think I am, as I know nothing about El Salto or Ixtlahuacan and have no clue as to what you’re writing about. But thanks for the kind words about the website anyway! :-)
Thank you! This data was the most helpful of all that I have read so far. I’ve conducted three successful firings in a backyard fire pit since reading your info, and it keeps getting better! Keep up the great research.
Just wanted to thank you for your very instructive blog and show the photos of a workshop we did using the information shared here.
Thank you very much
https://www.facebook.com/137dgr/posts/1069532396441466
Great photos and great works. Congratulations and thanks for sharing!
Greetings from Poland 🌺 Thank You so much for sharing your expierience !!!Its incredible . I am a freshman in ceramics and I am willing to start to practice alternative fireing . Once again, THANK YOU 🥰
Greetings from North Carolina! This article was so awesome and informative. I plan to try this soon. Thank you!!!
Thank you for documenting your process. I too am a mixture of scientist and artist. I am new to the process and have done 3 firings so far. I have a log book that I am keeping notes and documenting my scientific process. I am so very glad that I came upon your blog today.
My pots all turned out black this time. I got stunning colors last firing but since I am also new to pottery, I had some air bubbles that blew out. I went through my notes and analyzed my process to try to figure out why they all came out solid black this time.
Your blog has really helped me work through my variables and determine what I need to try next. I forgot the salt this time! And I think my fire was not right. Now I need to get busy making some pots so that I can try again.
A question if you are still checking your blog. I tried Johnson wax on my pots and they did not get very shiny. Any idea why?
So inspiring. Looking forward to building a burn and seeing what nature will create with me. Your blog was extremely interesting, keep on firing!
Thank you for sharing, beautiful work.