There was a time when the only thing I was reasonably sure of about pit firing, as far as fuming effects and colors go, is that you’d get a jet black area where your pot is buried in the sawdust or horse manure. But those days are behind me now, and as I have achieved better control over the fuming effects of my pieces, I start to itch for ways to get rid of those jet black areas that are the tell-tale signs of pit firing.
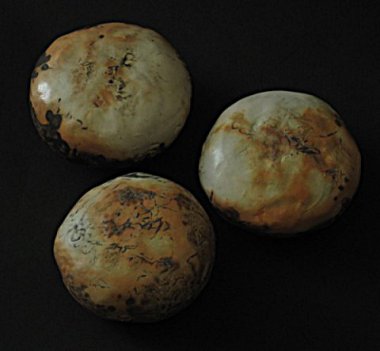
The design of this experiment, then, was pretty straightforward. Since the jet black areas correspond to where the pieces touch the sawdust and manure, why not just raise the pieces up so they don’t touch them anymore? As you can see from the results, figure 1 above and figure 2 below, the experiment was, in a strictly technical sense, quite successful, as there was hardly any sign of those shiny jet black areas visible on these pieces.
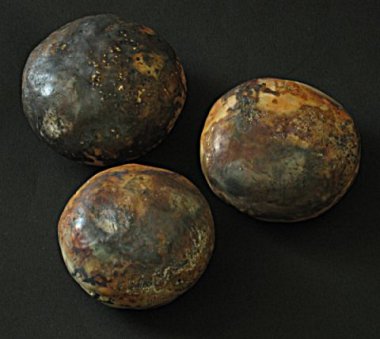
Upon closer inspection, though, I began to feel rather disappointed. I had, perhaps unrealistically, hoped to retain some of these other colors besides the jet black, such as the deep maroon red, and especially the pretty blue or greenish grays, as seen here and here — which are completely missing in these pieces here.
I did notice that on my regular pieces, e.g. the ones shown in the links above, the most interesting colors often seem to happen in a transition zone that borders the jet black area, which I figured must have something to do with the reduction atmosphere resulting from having the densely packed sawdust or manure nearby, the smoldering of which, after all, was what has caused the carbonization of the jet black area in the first place.
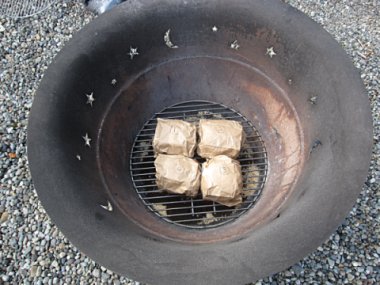
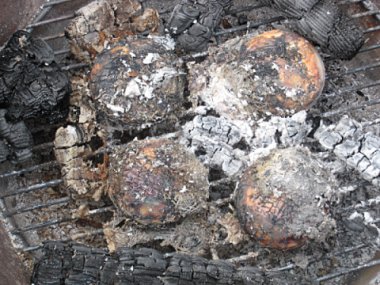
And here it is, in all likelihood, the reason why we are not having those wonderful colors. As you can see in figure 3 above, I have kept the sawdust and manure layer in the pit unchanged, and simply raised the pieces up by setting them on a BBQ grill instead; but now, in hindsight, it’s obvious that the grating was set far too high above the sawdust and manure (figure 3, 4), so there was simply no chance for the pieces to be in a reduction atmosphere any time during the firing, as oxigen would have been plentiful in the air space beneath them.
The result (figure 1, 2) was quite predictable then — a set of pieces that were very lightly fumed and very blond on the bottom side. And this is really not what I had hoped for when I started the experiment. My intention was to get rid of just the jet black area, while keeping most, if not all, the other colors intact.
Okay, so I was disappointed. But as a thought experiment, let’s take off that mad scientist hat for a moment, and try instead to look at these pieces afresh, without any presupposition — then perhaps, just perhaps, we could come to the conclusion that, if solely based on looks, these pieces are really not so unlovably hideous, after all.
Furthermore, even if we were to insist on disregarding aesthetics, and sticking purely to techniques, there is still the interesting question of why we see a difference between the top and bottom sides of the pieces — and the more pragmatic question of what we would need to do, if the objective is to have the same blond effects on both sides. Perhaps we could put a grill or some kind of wire mesh on top of the pieces too, to keep the hot embers and ashes at a distance, like we did at the bottom?
And here is what I am really trying to say — even as I profess to favor a structured and methodical approach to my firings, with clearly defined goals and objectives, I still strive to keep an open mind for any accidental and unintended results, as they may open new venues and show new directions for me to proceed further. Such happy accidents are, I suspect, rather common for all creative endeavors, whether in art or in science; and we would do well to learn to accept and embrace them, even if they might have come originally as spoilers for our plans and intentions.
Fascinating work, documented in such detail! It’s not something I’ve ever tried before I do love the way you can ‘see’ smoke on pieces that have been treated like this. Maybe you need to embrace a little Wabi-sabi when it comes to your work!