I thought it was just a fluke the first time this happened. I was at a group pit fire last year where I had seven pieces out of a total of thirty some pots in all. Most of my pieces turned out beautifully, so I wasn’t too upset when I noticed that one of them did not have any colors at all — only black and various shades of gray.
Well, it must have been in a corner where we forgot to sprinkle copper carbonate; and the copper mesh and salted raffia wrapped around the piece must have gotten knocked loose by falling logs too — so I thought to myself, and promptly forgot about the whole thing.
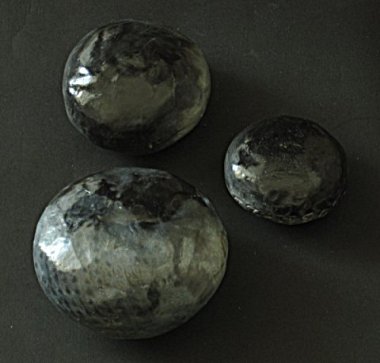
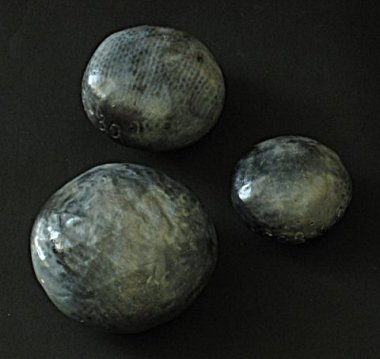
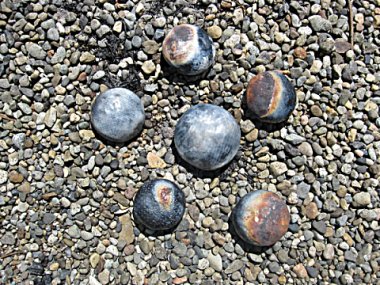
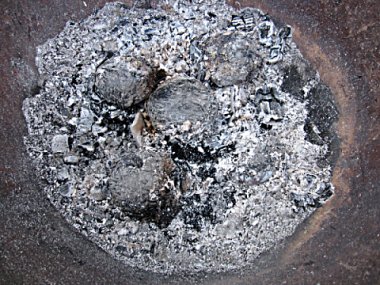
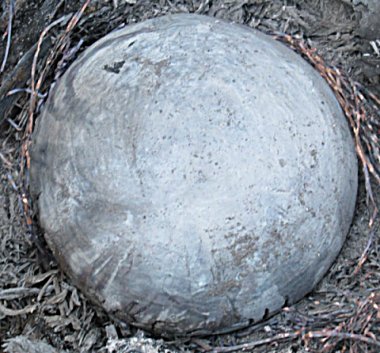
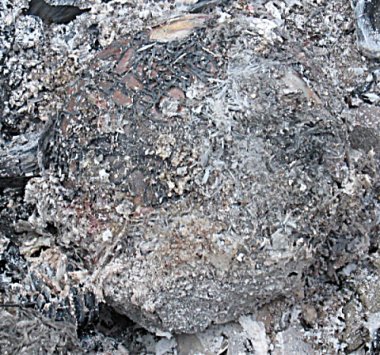
Then I started to do a lot of firings in my little backyard pit, and much to my chagrin, these all-black or black-and-gray rocks also began to crop up a lot more frequently (figure 1 above, and figure 2 below.)
I was puzzled. Luckily, I have been doing what I preached, and have plenty of notes and photographic records for all the firings I’ve done in this pit. So now it’s time to dig these notes and photographs out, and see if we can get a handle on what’s been causing the problem.
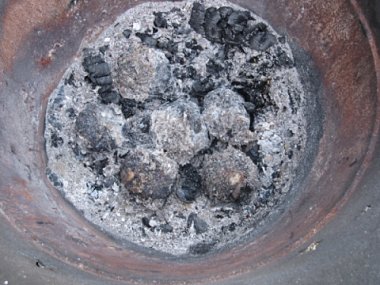
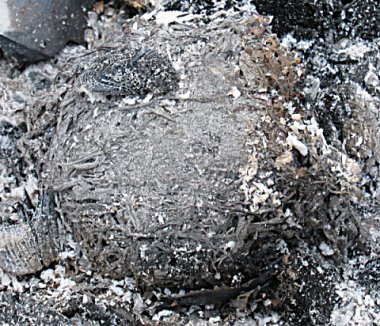
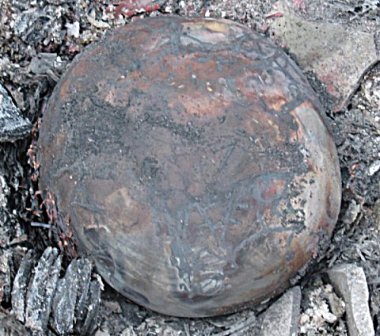
Below (figure 3) is what it looks like at the end of one particular firing where all six pieces have gotten plenty of colors. Notice how the outline of each piece is clearly visible, as they all have emerged from the ashes and are now completely exposed.
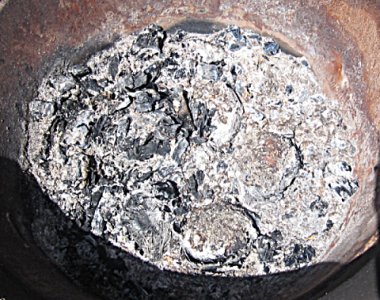
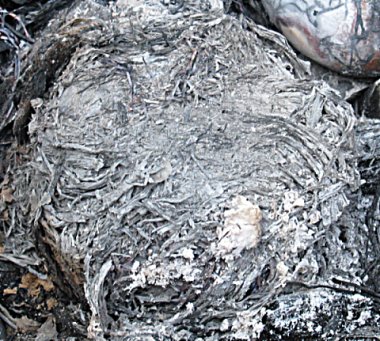
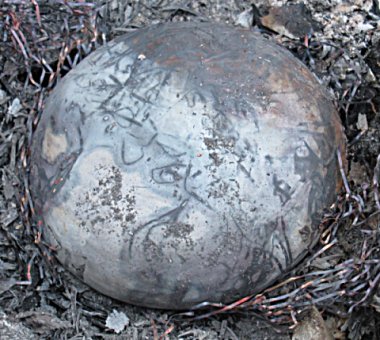
In contrast, the photo below in figure 4, also of the end of a firing, is from one where half of the pieces were black and gray, or nearly all black and gray. As it turns out, there were also six pieces in the pit, in a similar configuration as the above, but more evenly distributed.
But you wouldn’t know it from just a quick look at the picture below (figure 4), except for the three pieces clearly shown on the right hand side. And you probably wouldn’t have guessed there was a piece in the center had I not told you so.
Since it so happens that I have taken a group shot of the pieces immediately after their removal from the pit, arranged as per the original layout during the firing (figure 5, below), let’s compare these two photographs side by side and see if we can learn anything from them.
What we can clearly see, then, is that the three exposed pieces in the previous picture (figure 4, above) turned out to be the three colorful pieces in this one, while the others turned out to be just black and gray, or mostly black and gray with just a small area of colorful fuming.
So a pattern is emerging: if the hot embers have burned down enough to expose the pots at the end of a firing, then chances are that we would get decent colors. On the other hand, if by the end of the firing, a pot is still buried in the ashes, then we may get a black-and-gray piece instead.
Well, that was a pretty good hypothesis as far as hypotheses go, but in real life things always have a way to turn out more complicated than we think at first. Let’s consider the photograph above (figure 6), which shows the end of yet another firing.
In this firing there were five pieces in the pit, and indeed, the one buried in ashes in lower right turned out to be all black and gray. No surprises there. But how about the other four? Let’s examine them one by one, starting with the one in the lower left first.
As you can see in the close-up photo above (figure 7), the piece has fully emerged from the surrounding ashes. However, the fuming materials wrapped around it, in particular the salted raffia, is still pretty much intact, and doesn’t even show much charring either, except maybe just a little in the lower right hand side.
Okay, I did write about aiming to have the saggar-shell of fuming materials still visible at the end of a firing; but I was talking about having a flimsy remnant of it barely hanging onto the piece, and that’s not what we are seeing here.

Instead, what we have here is a largely unburned bundle of packing materials, the removal of which reveals a nearly unmarked surface underneath (figure 8, above) — barely fumed to a very light gray, with just a slight hint of colors only at the lower right corner, roughly corresponding to where some charring was detectable in the previous picture (figure 7).
So it sure looks like we are onto something here. Still, caution dictates not drawing any conclusion just yet — as we still have three more pieces to examine.
Let’s now move on to the third piece (figure 9, above), the one that was at the center of the pit. Again, this piece has emerged completely from the ashes; and it, too, has a coat of mostly undisturbed and unburned raffia wrapped round it.
And the result? Well, there are no surprises here either — we have a barely touched grayish surface beneath the coat of unburned raffia (figure 10, below), just like we do on that previous piece.
Now, for something completely different, let’s take a look instead at the piece (figure 11, below) that was in the upper right hand corner in the pit. Immediately we can see that not only does the coat of fuming materials, or whatever is left of it, look precariously flimsy; but part of the bare surface of the piece itself, fumed to a dark orange brown color, is showing through as well.
And indeed, the removal of this flimsy shell reveals a surface (figure 12, below) that’s well smoked into a deep orange brown; furthermore, even without wiping off the soot and dirt still on it, one can already see interesting fuming marks starting to appear in places.
So we can almost draw our conclusions now: if the embers have burned down to expose a piece at the end of a firing, and if the fuming materials wrapped around the piece have been burned down to a flimsy shell, then we’ll probably see some nice colors; otherwise, we may see a black-and-gray pot instead.
But let’s wait just a little longer, and take a look at something that’s perhaps even more convincing — the last piece to be examined (figure 13, below), which was in the upper left corner of the pit during the firing.
What’s interesting about this one is that it has a saggar-shell that’s partially burned, i.e. the upper right 1/4 or so has burned down to a thin flimsy coat like the previous one (figure 11), while the remaining 3/4 consists of unburned raffia like what was on the two gray pieces shown earlier.

After removing this partially burned shell we come upon something most interesting but not unexpected by now (figure 14, below), i.e. what was under the flimsy 1/4 of the saggar-shell remnant got fumed with good colors, while the remaining 3/4 that was under the unburned raffia turned out to be largely grayish in contrast.
In other words, on this piece one can clearly see how the varying conditions of the remaining saggar-shell at the end of a firing affect the coloring underneath.
Well, in truth I have just misspoken somewhat. The final condition of the shell actually does not affect the fumed colors per se; rather, it acts as a post mortem indicator of how well that fuming has succeeded. What does affect the fuming, as well as the final condition of the shell, is the flame patterns surrounding the piece during the firing.
So this is what it’s really about: good flame action around the piece insures that the fuming materials — the metals and the salts — will get sufficiently heated to become volatile and do their chemical magic, and the state of the raffia shell provides a visual clue to whether enough flame action is taking place, or has taken place, for this chemical magic to occur.
With this focus on flame action in mind, we have now yet another tool at our disposal during a firing, as these saggar-shells around the pots can provide tell-tale signs of how and whether the fuming is working. I’ll have more to say about the practical use of this tool — as applied to a recent firing — in a future post.
I just stumbled upon your site, and am fascinated! I am trying to learn how to do smoke-firing, but on a MUCH smaller scale, as I don’t have pots and pots, but little ocarinas :)
But what you found here I also found to be true – the question for me has been, HOW DO I ENSURE A GOOD BURNING, vs. too much smoldering leaving the pots barely touched?
I look forward to your next post :)
Debbie